
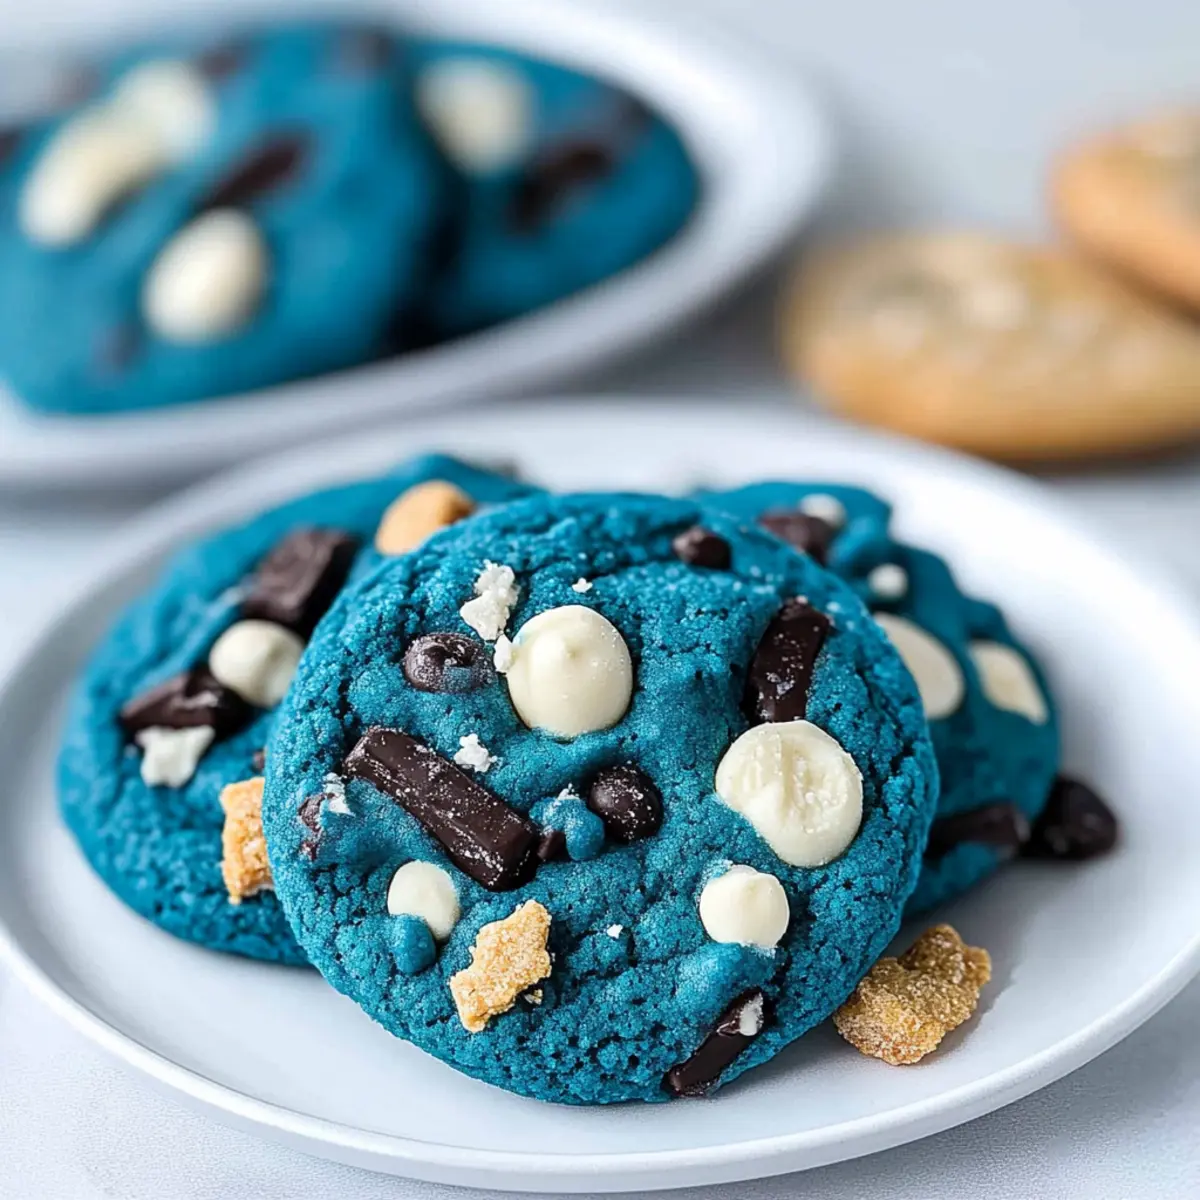
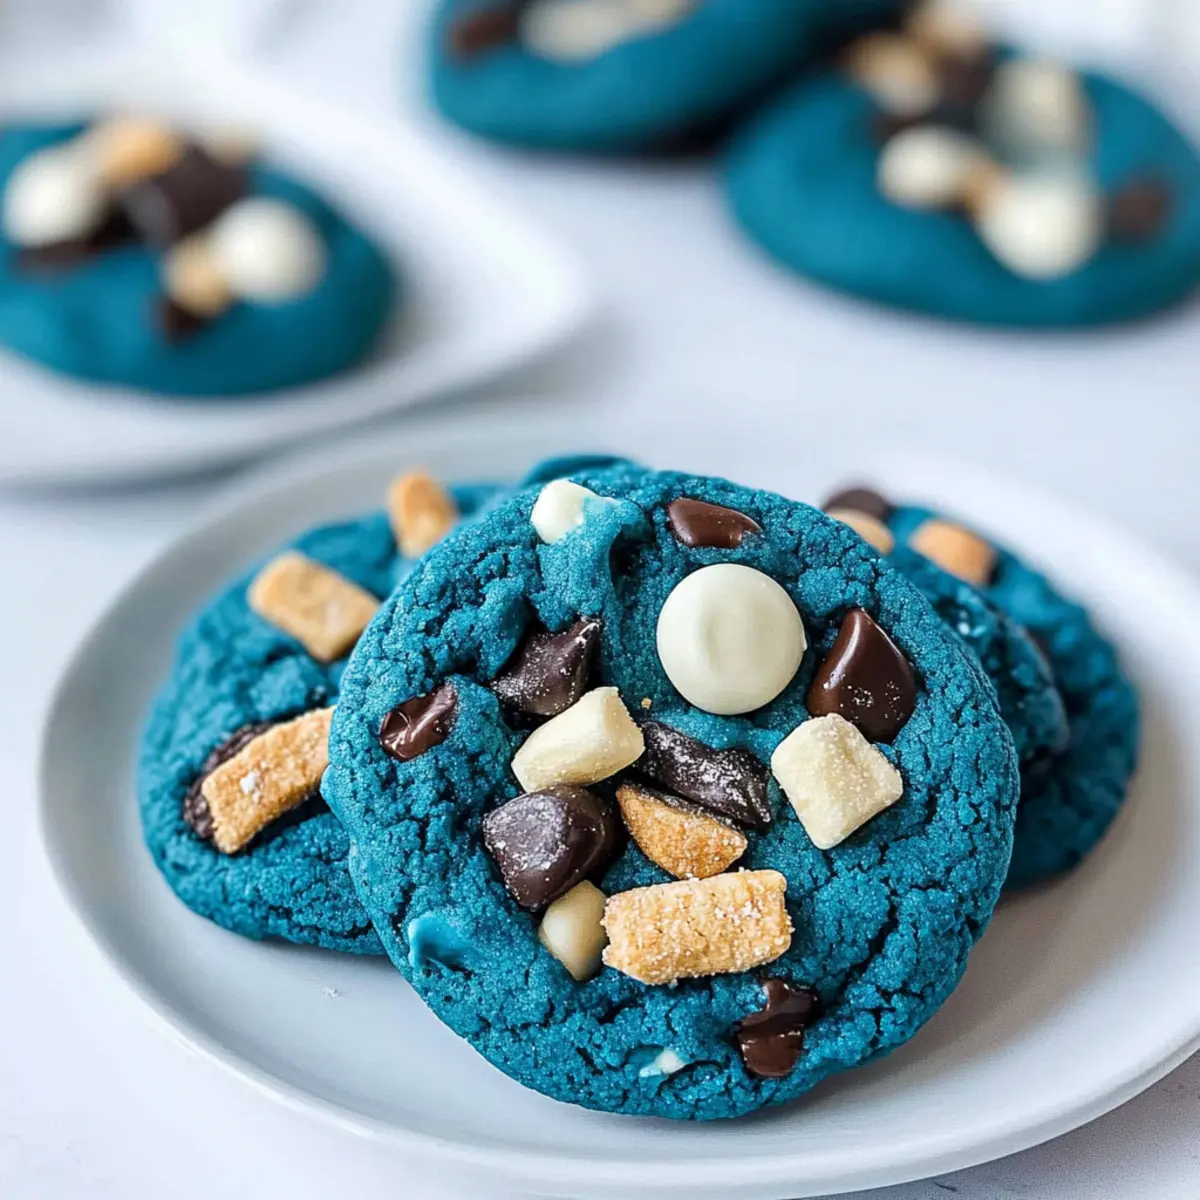
There’s something utterly captivating about a cookie that tells a story, and these Cookie Monster Cookies do just that! Brimming with vibrant blue color and a delightful mix of textures, they’re the kind of fun dessert that turns an ordinary afternoon into a festive occasion. Whether you’re celebrating a birthday or simply sharing sweet moments with family and friends, these chewy treats combine the best of white chocolate with the irresistible crunch of Chips Ahoy and Oreos. Plus, they’re incredibly easy to whip up, making them a fantastic choice for both seasoned bakers and those just starting their culinary journey. Ready to bring some joyful color to your baking? Let’s dive into the delicious world of Cookie Monster Cookies!
Why Are Cookie Monster Cookies So Fun?
Colorful, Eye-Catching Appeal: These vibrant blue cookies are not just tasty but also a visual treat that will bring smiles to every gathering.
Easy to Make: With simple ingredients and straightforward steps, you’ll whip up these colorful delights in no time, even if you’re short on baking experience.
Customizable Fun: Feel free to substitute chocolate types or add your favorite cookies to create a unique flavor profile, ensuring everyone gets a taste they love.
Perfect for Parties: Whether it’s a birthday celebration or a festive school event, these cookies are sure to steal the show and satisfy cookie cravings.
Kids-Friendly Delight: Kids adore their fun colors and chewy textures, making them an instant favorite for family gatherings. If you’re also looking for delightful treats, check out my Snowball Cookies Melt or Chocolate Meringue Cookies for more festive ideas!
Cookie Monster Cookies Ingredients
For the Dough
• All-Purpose Flour – Provides structure and chewiness; substitute with gluten-free all-purpose flour for a gluten-free version.
• Cornstarch – Enhances softness; do not substitute, as it’s essential for the cookie’s texture.
• Baking Soda – Acts as a leavening agent for lift; ensure it’s fresh for best results.
• Salt – Balances sweetness; sea salt can be swapped for a fancier taste.
• Unsalted Butter – Adds richness and moisture; margarine can be used for a dairy-free alternative.
• Brown Sugar – Provides moisture and deep flavor; white sugar can lighten the taste.
• Granulated Sugar – Adds sweetness and texture; can be reduced for a lighter cookie.
• Large Eggs – Binds ingredients and adds moisture; aquafaba can serve as a vegan alternative.
• Vanilla Extract – Brings aromatic sweetness; use pure extract for the best flavor.
• Royal Blue, Electric Blue, and Violet Gel Food Coloring – Achieve the signature Cookie Monster blue; avoid liquid coloring for vibrancy.
For the Mix-ins
• White Chocolate Chips – Adds sweetness and creaminess; can be replaced with milk or semi-sweet chocolate chips if preferred.
• Chips Ahoy Cookies – Introduces crunch and chocolate flavor; swap with your favorite store-bought cookie.
• Chopped Oreos – Enhances flavor and texture; you can customize with any cookie you like.
Dive into this colorful world of Cookie Monster Cookies, and unleash your creativity!
Step‑by‑Step Instructions for Cookie Monster Cookies
Step 1: Preheat the Oven
Preheat your oven to 350°F (175°C) and line a baking sheet with parchment paper or a silicone baking mat. This initial step sets the perfect baking environment for your Cookie Monster Cookies, ensuring they bake evenly and come out soft and chewy.
Step 2: Mix Dry Ingredients
In a mixing bowl, whisk together the all-purpose flour, cornstarch, baking soda, and salt. This blend of dry ingredients will give your cookies structure and enhance their chewiness. Set this mixture aside, as it will be incorporated into your cookie dough shortly.
Step 3: Cream Butter and Sugars
In a large mixing bowl, use an electric mixer to beat the unsalted butter, brown sugar, and granulated sugar together for about 2 minutes until the mixture is light and fluffy. This step creates a creamy base that will add richness and sweetness to your Cookie Monster Cookies.
Step 4: Add Wet Ingredients
Add in the large eggs and vanilla extract to the creamed mixture, mixing until fully combined. This step adds moisture and flavor to your cookie dough, ensuring that the future cookies are not only delicious but also tender and delightful to bite into.
Step 5: Color the Dough
Gradually add the dry ingredient mixture into the wet ingredients, mixing just until incorporated. Drizzle in the gel food coloring while continuing to mix until you achieve that vibrant Cookie Monster blue shade. Be careful not to overmix, as you want your cookies to stay tender!
Step 6: Fold in Add-ins
Using a spatula, gently fold in the white chocolate chips, crushed Chips Ahoy cookies, and chopped Oreos until they are evenly distributed throughout your colorful dough. This is a key step that adds texture and bursts of flavor, making every bite of your Cookie Monster Cookies a fun surprise.
Step 7: Form and Shape Cookies
Using a cookie scoop or your hands, portion out 2-tablespoon-sized balls of dough and roll them gently. Place each ball on the prepared baking sheet, leaving enough space between them. Press a few extra mix-ins on top of each ball for added flair before baking.
Step 8: Bake
Bake your cookies in the preheated oven for about 10-12 minutes, watching closely to ensure they don’t over-brown. The edges should appear set, but the centers might look slightly underbaked—this is perfect for that chewy texture found in your Cookie Monster Cookies!
Step 9: Cool Down
Once baked, remove the baking sheet from the oven and allow the cookies to cool on the sheet for about 15 minutes. This resting period helps them firm up and makes it easier to transfer them to a wire rack, where they can cool completely and be enjoyed!

Cookie Monster Cookies: Fun Variations Await!
Feel free to get creative with these whimsical Cookie Monster Cookies and make them truly your own!
-
Gluten-Free: Substitute traditional flour with gluten-free all-purpose flour to accommodate dietary needs without sacrificing flavor.
-
Chocolate Lovers: Swap white chocolate chips for semi-sweet or dark chocolate chips for a richer, more indulgent cookie experience.
-
Nutty Goodness: Use crushed peanut butter cookies instead of Chips Ahoy for a mouthwatering twist that adds a delightful nutty flavor.
-
Candy Coated: Mix in vibrant candy-coated chocolates for an added crunch and burst of color that will cheer up any cookie platter!
-
Vegan Delight: Replace the eggs with aquafaba or flax eggs and use coconut oil or vegan butter as a substitute for a plant-based cookie treat.
-
Fun Eyeballs: Before baking, press edible candy eyeballs into the dough for a playful touch that’s especially entertaining for kids’ parties.
-
Bigger Cookies: Use a 1/4 cup measuring cup to form larger cookies that are extra soft and chewy in the center; just be sure to adjust the baking time.
-
Festive Sprinkles: Add seasonal sprinkles to transform them into a fun and themed treat that’s perfect for holidays or special celebrations.
If you’re on a cookie adventure, don’t forget to check out my Winter Wonderland Cookies for more delightful treats!
Expert Tips for Cookie Monster Cookies
-
Achieve Vibrant Color: Add a touch of purple gel food coloring to offset any yellow tones in your dough for the perfect Cookie Monster blue.
-
Mix with Care: Avoid overmixing the dough after adding food coloring. This ensures your cookies remain soft and chewy, enhancing the overall texture.
-
Timing is Key: Keep a close eye on baking time; ovens vary! Slightly underbaking yields that perfect chewy center—just like you want for your Cookie Monster Cookies.
-
Storage Savvy: Store any leftovers in an airtight container to maintain freshness for up to 3 days, or refrigerate to last longer without losing taste.
-
Customize Your Treats: Feel free to swap the mix-ins! Using different types of cookies or chocolates can give your Cookie Monster Cookies a delightful twist tailored to your family’s taste buds.
What to Serve with Cookie Monster Cookies?
Indulging in these vibrant treats is just the beginning of a delicious adventure; let’s turn your cookie experience into a full festive feast!
-
Milk: A classic pairing that enhances the sweetness of the cookies, making every crisp and chewy bite even more irresistible.
-
Fruit Salad: The freshness of a colorful fruit salad contrasts beautifully with the rich flavors of the cookies, adding an uplifting note to your dessert table. Toss together strawberries, blueberries, and bananas for a vibrant mix that’s as appealing as the cookies!
-
Ice Cream: Scoop your favorite vanilla or cookies and cream ice cream on top for a decadent dessert. The creaminess complements the chewy texture of the Cookie Monster Cookies perfectly.
-
Coffee: A warm cup of coffee provides a delightful balance to the sweetness, enhancing the cookie experience for adults. The rich aromas work perfectly with the chocolaty bits and bright colors.
-
Chocolate Dipping Sauce: For those who crave an extra dose of sweetness, a drizzle of warm chocolate sauce can transform these cookies into a gourmet treat. It’s a fanciful way to indulge even further!
-
Colorful Sprinkles: Add a sprinkle of fun by serving these cookies alongside a bowl of colorful sprinkles. Guests can dip or roll their cookies for a festive touch that kids and adults alike will enjoy.
Turn your Cookie Monster Cookies into a delightful spread, bringing smiles and sweetness to every gathering!
Make Ahead Options
These Cookie Monster Cookies are a fantastic choice for busy cooks looking to save time during the week! You can prepare the dough up to 3 days in advance; simply mix all the ingredients as instructed, then cover the bowl tightly and refrigerate. This not only enhances the flavors but also makes baking a breeze when you’re ready. When you’re ready to enjoy these delightful treats, scoop out the chilled dough, form them into balls, and bake as directed. If you prefer even longer storage, you can freeze the formed dough balls for up to 3 months and bake from frozen, adding a minute or two to the baking time. With these make-ahead tips, you’ll have fun and flavorful Cookie Monster Cookies at your fingertips, ready to impress family and friends!
How to Store and Freeze Cookie Monster Cookies
Room Temperature: Store cookies in an airtight container at room temperature for up to 3 days. This keeps them soft and chewy, perfect for everyday snacking.
Fridge: For longer freshness, you can refrigerate the cookies in an airtight container for up to a week. Let them come to room temperature before enjoying for the best texture.
Freezer: To save cookies for later, freeze them in a single layer on a baking sheet, then transfer to a freezer-safe bag for up to 3 months. Thaw before serving for delightful results.
Reheating: If you want to enjoy warm cookies, pop them in the microwave for about 10-15 seconds. This brings back the chewy goodness of your Cookie Monster Cookies!

Cookie Monster Cookies Recipe FAQs
What is the best way to select ripe ingredients for Cookie Monster Cookies?
Absolutely! For the best Cookie Monster Cookies, ensure your butter is at room temperature, making it easy to cream with the sugars. Fresh eggs are vital; check for a firm shell and no cracks. Additionally, for flour, look for a fine texture and a good shelf life for optimal baking results.
How should I store my Cookie Monster Cookies to keep them fresh?
To maintain their delightful texture, store your Cookie Monster Cookies in an airtight container at room temperature for up to 3 days. For extra longevity, refrigerate them; they’ll stay fresh for about a week. Just remember to let them sit at room temperature for a few minutes before diving in!
Can I freeze Cookie Monster Cookies?
Definitely! To freeze your Cookie Monster Cookies, first, place them in a single layer on a baking sheet until solid. Then transfer them into a freezer-safe bag or container, where they can be stored for up to 3 months. When ready to eat, thaw them at room temperature or gently warm in the microwave for that fresh-baked goodness!
How can I troubleshoot if my cookies are too flat or crumbly?
Very often, flat cookies can be caused by too much butter or not enough flour. Make sure to measure your ingredients accurately. If your Cookie Monster Cookies turn out crumbly, check that your butter is not too cold; creaming it well with the sugars helps create an ideal texture. For best results, always stick to room temperature for your butter!
Are Cookie Monster Cookies safe for pets or people with allergies?
While these colorful treats are delightful for humans, it’s important to remember that ingredients like chocolate and certain cookies (like Oreos) can be harmful to pets. Always store them securely away from furry friends. If anyone in your household has allergies, be mindful of ingredient substitutes, such as using alternative dairy-free options for your butter and checking for nut cross-contamination in cookies.
Cookie Monster Cookies: Irresistibly Chewy and Colorful Fun
Ingredients
Equipment
Method
- Preheat your oven to 350°F (175°C) and line a baking sheet with parchment paper or a silicone baking mat.
- In a mixing bowl, whisk together the all-purpose flour, cornstarch, baking soda, and salt.
- In a large mixing bowl, beat the unsalted butter, brown sugar, and granulated sugar together for about 2 minutes until light and fluffy.
- Add the large eggs and vanilla extract to the creamed mixture, mixing until fully combined.
- Gradually add the dry ingredient mixture into the wet ingredients, mixing just until incorporated. Drizzle in the gel food coloring and mix.
- Gently fold in the white chocolate chips, crushed Chips Ahoy cookies, and chopped Oreos until evenly distributed.
- Using a cookie scoop, portion out 2-tablespoon-sized balls of dough and place them on the prepared baking sheet, pressing extra mix-ins on top.
- Bake for about 10-12 minutes, watching closely to ensure they don’t over-brown.
- Remove the baking sheet from the oven and allow the cookies to cool on the sheet for about 15 minutes.
Leave a Reply