
The aroma of rich chocolate mingling with the nutty fragrance of oats—it’s almost intoxicating, isn’t it? As I stood in my kitchen, stirring together a few simple ingredients, I couldn’t help but feel a wave of excitement about these easy 4-Ingredient Gluten-Free No-Bake Chocolate Oat Cookies. Not only do they come together with minimal effort, but they’re also the perfect sweet treat when you’re looking for something wholesome and delicious. The best part? They’re a great option for anyone craving a snack without the gluten or the fuss of baking! Whether you’re indulging your sweet tooth or looking for a quick, satisfying bite, these cookies deliver on all fronts. Curious about how these delightful morsels come together? Let’s dive into the recipe!
Why are these cookies so irresistible?
Simplicity at Its Best: With just four ingredients, these cookies take minimal time to prepare and are perfect for those busy days.
Chocolatey Delight: The rich, indulgent flavor of cocoa powder brings a decadent touch that satisfies any sweet craving without guilt.
Customizable Options: Whether you’re gluten-free or just looking for a no-bake treat, you can easily tailor these cookies to fit your dietary needs.
Quick to Make: Forget complex baking routines; these cookies chill in the fridge for just 30 minutes before they’re ready to enjoy!
Crowd-Pleaser: Kids and adults alike will adore these chewy treats—perfect for afternoon snacks or as a healthier dessert option. Pair them with your favorite drink, and you’d be surprised just how quickly they disappear! 🍪 For more tasty inspirations, don’t miss our delectable Loaded Baked Potato or the irresistible Honey Chicken Sweet!
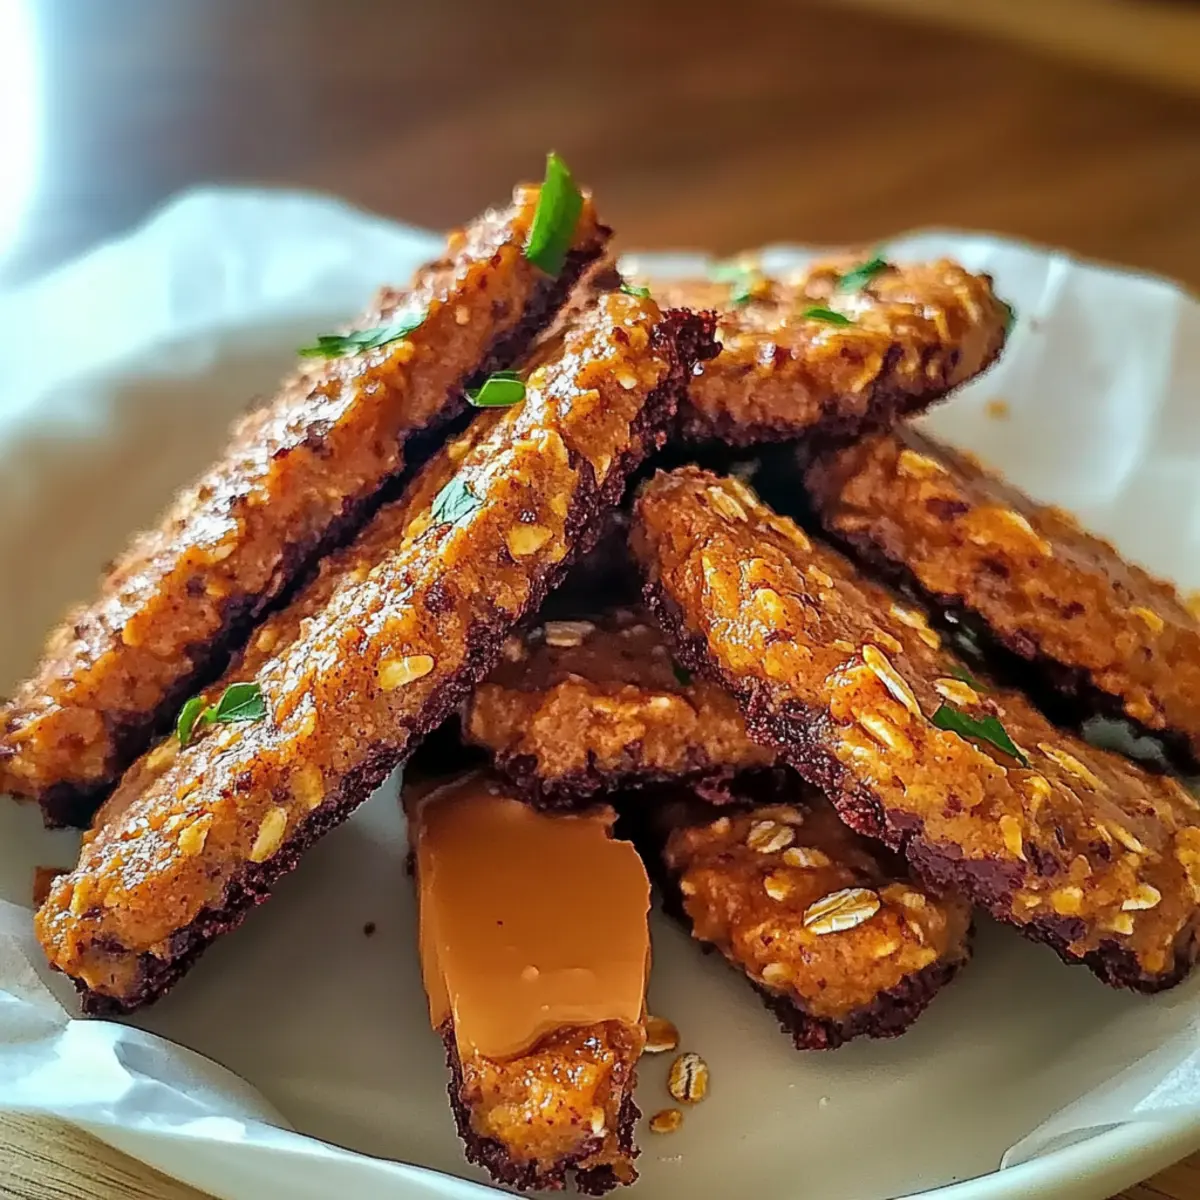
4-Ingredient Gluten-Free No-Bake Chocolate Oat Cookies Ingredients
• All you need for these delectable cookies!
For the Cookies
- Oats – Provides structure and chewiness; use certified gluten-free oats if necessary.
- Peanut Butter – Adds richness and helps bind the cookies; substitute with almond butter for a nut-free version.
- Cocoa Powder – Imparts chocolate flavor and color; Dutch-processed cocoa can enhance the taste.
- Honey or Maple Syrup – Sweetens the cookies and adds moisture; for a vegan option, use maple syrup.
Feel free to enjoy these delightful Chocolate Oat Cookies knowing they bring both ease and joy to your snacking experience!
Step‑by‑Step Instructions for 4-Ingredient Gluten-Free No-Bake Chocolate Oat Cookies
Step 1: Mix Dry Ingredients
In a medium mixing bowl, combine 1 cup of oats and ¼ cup of cocoa powder. Stir well until they are evenly mixed and the cocoa is fully incorporated, creating a uniform chocolatey base. This will ensure each cookie has that delicious chocolate flavor throughout.
Step 2: Add Peanut Butter
Next, add ½ cup of peanut butter to the dry mixture. Use a spatula to gently fold the peanut butter in, ensuring it blends seamlessly with the oats and cocoa. This step should take about 1-2 minutes, and you’ll know it’s ready when the mixture is consistent and slightly sticky.
Step 3: Sweeten the Dough
Gradually stir in ¼ cup of honey or maple syrup into the mixture. Continue mixing until the dough comes together, approximately another 2 minutes. The mixture should form a sticky and cohesive texture, making it easier to shape into cookies later.
Step 4: Shape the Cookies
Using a tablespoon, scoop out portions of the dough onto a parchment-lined tray. Gently flatten each scoop with the back of your spoon to form disk shapes about ½ inch thick. Ensure they’re spaced about an inch apart, allowing for easy removal once set.
Step 5: Chill to Set
Place the tray in the refrigerator and allow the cookies to chill for at least 30 minutes. This step is crucial for the cookies to firm up into that blissful chewy texture. Once chilled, the cookies should hold their shape well when removed from the tray.
Step 6: Enjoy Your Treats
After chilling, your 4-Ingredient Gluten-Free No-Bake Chocolate Oat Cookies are ready to serve! Pair them with a cold glass of milk or coffee for a delightful snack. Store any leftovers in an airtight container in the refrigerator for up to a week.

How to Store and Freeze Chocolate Oat Cookies
Fridge: Store cookies in an airtight container in the refrigerator for up to one week to maintain their chewy texture and flavor.
Freezer: For longer storage, freeze the cookies in a single layer on a baking sheet before transferring them to a freezer-safe bag. They can last up to 3 months!
Reheating: Enjoy cookies straight from the fridge or thaw frozen ones at room temperature. For a warm treat, microwave them for about 10 seconds.
Serving Suggestion: Pair leftover cookies with a glass of milk or coffee for a delightful snack anytime you’re craving a sweet fix!
What to Serve with 4-Ingredient Gluten-Free No-Bake Chocolate Oat Cookies
Looking to create a memorable meal experience? These delightful cookies beckon for perfect pairings that elevate their chocolaty goodness.
- Crispy Oven Baked Sweet Potato Fries: Their savory crunch beautifully contrasts the cookies’ softness, creating a delightful snacking experience.
- Creamy Greek Yogurt: A dollop on the side complements the sweetness of the cookies while adding a tangy twist.
- Fresh Berries: Pop these juicy gems alongside the cookies for a burst of freshness that brightens the palate.
- Nutty Granola: Sprinkle a bit of granola for an extra crunchy texture, making each bite of cookie even more exciting!
- Chamomile Tea: This soothing beverage enhances the rich chocolate flavor, making for a comforting twist during snack time.
- Vanilla Ice Cream: A scoop of creamy bliss makes an indulgent dessert when served with these chilled cookies.
- Dark Chocolate Drizzle: Elevate the chocolate experience with a sweet topping that adds richness and visual appeal to your plate.
- Peanut Butter Smoothie: Pairing this with cookies brings delightful echoes of flavor without overwhelming sweetness.
- Coconut Chips: For a tropical flair, these crunchy morsels give a nice contrast to the chewy cookies and add a subtle nutty flavor.
Make Ahead Options
These 4-Ingredient Gluten-Free No-Bake Chocolate Oat Cookies are perfect for meal prep enthusiasts! You can prepare the dough up to 24 hours in advance, ensuring you have a sweet treat ready to chill. Simply mix the oats, cocoa powder, peanut butter, and honey or maple syrup as instructed, and then scoop the dough onto a parchment-lined tray. Cover the tray with plastic wrap and refrigerate until you’re ready to serve. For the best quality, it’s important to keep them airtight in the fridge once set; they will still be just as delicious even the next day! When you’re ready to enjoy, simply take them out and serve—no fuss, just delightful cookies at your fingertips!
Crispy Oven Baked Sweet Potato Fries Variations
Customize your crispy oven baked sweet potato fries with easy and delicious twists that’ll elevate their flavor and texture!
-
Gluten-Free: Use the same method with alternative flours like almond or coconut flour to create a gluten-free coating.
-
Spicy Kick: Add cayenne pepper or chili powder for a spicy version that brings the heat and amps up the flavor.
-
Herb Flavor: Toss fries with dried rosemary or thyme to enhance the fries with an aromatic, earthy touch.
-
Sweet & Savory: Drizzle a bit of maple syrup before baking for a sweet contrast that pairs beautifully with the natural sweetness of sweet potatoes.
-
Cheesy Twist: Sprinkle nutritional yeast or finely grated Parmesan cheese on top after baking for a cheesy flavor boost without the guilt.
-
Zesty Lemon: Add zest from a lemon or lime to the mix for a fresh citrusy flavor that brightens every bite.
-
Oven-Baked Variations: For a crispy texture, consider trying the method used in my Crispy Oven Baked Sweet Potato Fries recipe, where they get extra crunchiness from a higher heat setting.
-
Air Fryer Magic: If you have an air fryer, prepare your seasoned fries in it for about 15-20 minutes to achieve a delightful crunch without additional oil.
Feel free to explore these variations to find your perfect combination, and don’t hesitate to pair your fries with tasty dips or enjoy them alongside my Broccoli Bacon Sweet dish for a wholesome meal!
Expert Tips for Chocolate Oat Cookies
-
Room Temperature Ingredients: Ensure all ingredients are at room temperature for better mixing and texture, leading to perfect no-bake cookies.
-
Avoid Overmixing: Mixing just until combined helps maintain a tender texture; overmixing can lead to dense, chewy cookies you may not love as much.
-
Chill Time Matters: Always refrigerate for at least 30 minutes before serving; this step is crucial for achieving the right consistency in your chocolate oat cookies.
-
Customize Wisely: Feel free to add chocolate chips or dried fruit, but remember that these additions may change the texture, making the cookies less firm.
-
Have Fun with Flavors: Try different nut butters like almond butter or incorporate a pinch of sea salt on top for a delightful sweet-and-salty treat!

4-Ingredient Gluten-Free No-Bake Chocolate Oat Cookies Recipe FAQs
What type of oats should I use for these cookies?
Absolutely! For the best results, you’ll want to use certified gluten-free oats. This ensures that those with gluten sensitivities or celiac disease can enjoy your delicious cookies without worry. Regular oats may come into contact with gluten during processing, so sticking to the certified option is a wise choice.
How should I store the cookies, and how long will they last?
These cookies will stay fresh in an airtight container in the refrigerator for up to one week. Keeping them refrigerated helps maintain their chewy texture and prevents any moisture loss. If you find that you have leftovers—or as I like to call them, treasures—be sure to stash them well!
Can I freeze Chocolate Oat Cookies? How?
Yes! For those moments when you want to stock up, you can freeze your cookies! First, lay them out in a single layer on a baking sheet, ensuring they aren’t touching. Freeze them for about 2 hours until solid, then transfer them to a freezer-safe bag. They can last up to 3 months in the freezer. When you’re ready for a treat, simply thaw them at room temperature or pop them in the microwave for about 10 seconds for a warm, comforting bite.
What if my cookie dough is too dry or crumbly?
Very! If your dough feels too dry and isn’t sticking together, you can add a little more peanut butter or honey/maple syrup—just a tablespoon at a time—until it reaches that perfect sticky consistency. Mix well after each addition until the dough is cohesive enough to form into cookies.
Are these cookies suitable for pets?
While these cookies are delicious for humans, it’s important to note that certain ingredients, like peanut butter, can be a snack for some pets, but they should always be enjoyed moderately and checked for xylitol—an artificial sweetener that is toxic to dogs. Always consult your vet before sharing human snacks with your furry friends.
Can I make these cookies vegan?
Absolutely! To make these cookies vegan, simply substitute honey with maple syrup. This small switch allows everyone to enjoy the goodness of Chocolate Oat Cookies while aligning with their dietary preferences. Now, grab your ingredients, and let’s get baking!

Crispy Oven Baked Sweet Potato Fries That Steal the Show
Ingredients
Equipment
Method
- Preheat your oven to 425°F (220°C).
- In a mixing bowl, toss the sweet potato fries with olive oil, salt, and paprika until evenly coated.
- Spread the fries in a single layer on a baking sheet lined with parchment paper.
- Bake for 25-30 minutes, flipping halfway through, until crispy and golden brown.
- Remove from the oven and let cool for a few minutes before serving.
- Enjoy your crispy sweet potato fries with your favorite dipping sauce!
Leave a Reply