
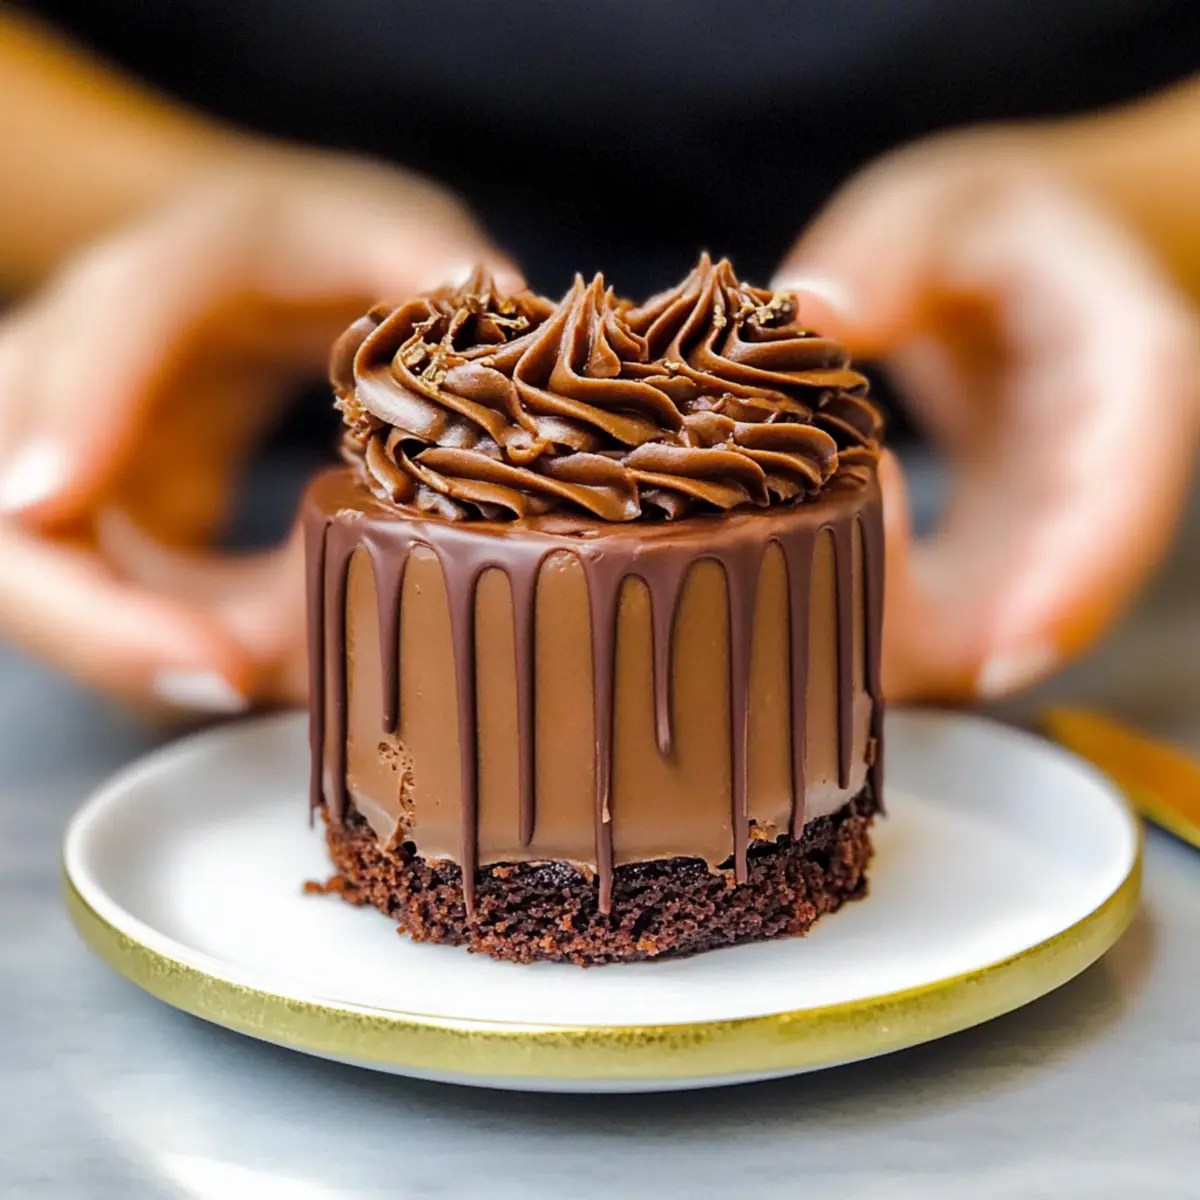
A sweet aroma wafts from the oven, dancing through my kitchen like an unwelcome guest. Today, I’m whipping up a delightful Mini Chocolate Cake—ideal for those moments when you crave a comforting dessert without the fuss of a full-size cake. This charming little treat not only satisfies your chocolate cravings but also offers a quick prep time that suits any busy schedule. Plus, with the option to make it gluten-free, everyone can indulge in a slice of happiness. Its moist texture and velvety chocolate buttercream make this cake a genuine crowd-pleaser, perfect for date nights or personal indulgence. Curious about creating this adorable dessert for two? Let’s dive into the recipe!

Why Is Mini Chocolate Cake So Adorable?
Simplicity at its finest: This recipe requires just one bowl and minimal effort, making it accessible for bakers of any skill level.
Irresistible Flavor: The rich cocoa and velvety buttercream work in harmony to deliver a chocolate experience that is both decadent and satisfying.
Perfect Portion: Ideal for couples or small gatherings, it provides just the right amount of dessert without overwhelming your diners.
Versatile Options: With easy adaptations for gluten-free baking, everyone can enjoy a slice of this delightful treat.
Crowd-Pleasing Appeal: Its charming size and impressive presentation will surely impress your guests, making it a standout dessert choice for any occasion. If you’re looking to whip up an additional dessert, consider pairing it with Chocolate Meringue Cookies for a sweet finale!
Mini Chocolate Cake Ingredients
• Perfect for Sweet Treats!
For the Cake
- All-Purpose Flour – Provides the necessary structure; swap with a gluten-free flour blend for a gluten-free mini chocolate cake.
- Granulated Sugar – Essential for sweetening the cake; no substitutions lead to the best flavor!
- Unsweetened Cocoa Powder – Adds that rich chocolate flavor; remember to sift to avoid clumps.
- Baking Powder – Acts as the leavening agent; crucial for achieving that fluffy texture.
- Salted Butter – Brings moisture and richness; feel free to use unsalted butter if preferred.
- Egg White – Helps bind the ingredients together and adds lightness; ensure it’s at room temperature for optimal mixing.
- Buttermilk – Contributes moisture and a touch of acidity; if unavailable, swap it out with heavy cream.
- Vanilla Extract or Bean Paste – Elevates the overall flavor and aroma; no substitution is necessary.
For the Chocolate Buttercream Frosting
- Salted Butter – Serves as the base for the frosting, offering rich creaminess; unsalted can be used based on dietary preferences.
- Vanilla Extract or Bean Paste – Deepens the flavor profile; always a delicious addition.
- Baking Cocoa – Intensifies the chocolatey goodness in your frosting.
- Powdered Sugar – Sweetens and gives thickness to the frosting mix; adjust the quantity for sweetness preference.
- Heavy Cream or Milk – Helps soften the frosting, making it easier to spread and work with.
Step‑by‑Step Instructions for Mini Chocolate Cake
Step 1: Preheat the Oven
Begin by preheating your oven to 350°F (175°C). While it heats up, prepare a 6-inch round cake pan by lining the bottom with parchment paper and greasing the sides with butter or cooking spray. This ensures your mini chocolate cake releases easily after baking.
Step 2: Mix Dry Ingredients
In a medium mixing bowl, combine the all-purpose flour, granulated sugar, sifted cocoa powder, baking powder, and a pinch of salt. Whisk these dry ingredients together until fully incorporated, which should create a uniform mixture. This step is essential for ensuring a consistent flavor throughout the mini chocolate cake.
Step 3: Combine Wet Ingredients
In the same bowl, add the melted salted butter and the room temperature egg white. Mix until these ingredients are well combined. Next, pour in the buttermilk and vanilla extract, stirring until your batter is smooth and glossy. This is where the magic of the mini chocolate cake begins!
Step 4: Bake the Cake
Pour the batter into the prepared cake pan, ensuring it is evenly distributed. Bake in your preheated oven for 25-30 minutes. The cake is ready when a toothpick inserted into the center comes out clean with just a few moist crumbs. Stay nearby, as the sweet aroma will fill your kitchen!
Step 5: Cool and Cut the Cake
Once baked, remove the mini chocolate cake from the oven and let it cool in the pan for about 10 minutes. Carefully invert the cake onto a wire rack to cool completely. After it’s cool, use a serrated knife to level the top and slice it into four rounds, each about 2.5 inches in diameter for easy layering.
Step 6: Prepare the Chocolate Buttercream Frosting
In a large bowl, beat the softened salted butter until creamy. Gradually mix in the sifted cocoa powder and powdered sugar, alternating with the heavy cream, until you achieve a smooth and spreadable consistency. The rich texture will perfectly complement your mini chocolate cake layers!
Step 7: Assemble the Mini Chocolate Cake
Begin assembling by placing the first layer of cake on a serving plate. Spread a generous layer of chocolate buttercream frosting on top, then repeat with the additional cake layers. Once all are stacked, cover the exterior with more frosting, creating a delightful, smooth finish. Feel free to get creative with decorations!

What to Serve with Mini Chocolate Cake?
A mini chocolate cake deserves a delightful spread that elevates the entire dining experience while showcasing its chocolatey charm.
-
Fresh Berries: Juicy strawberries and raspberries provide a tart contrast, making each bite of cake feel more vibrant and fresh.
-
Whipped Cream: Light and airy, a dollop of freshly whipped cream adds a creamy element that beautifully balances the richness of the chocolate.
-
Vanilla Ice Cream: The classic pairing of warm cake and cold ice cream creates a comforting combination that will satisfy any sweet tooth.
-
Chocolate Ganache: Drizzle some rich chocolate ganache over the cake for a decadent touch that intensifies the chocolate flavor profile.
-
Coffee: A warm cup of coffee complements the rich cocoa notes, enhancing the flavor and providing a cozy feel to your dessert time.
-
Mint Sprigs: Garnishing with fresh mint not only adds a pop of color but also brings a refreshing element that cuts through the cake’s sweetness.
-
Caramel Sauce: A drizzle of warm caramel adds a touch of sweetness and a delightful texture contrast, enhancing the overall dessert experience.
-
Bourbon or Whiskey: For the adults, serving a small glass of bourbon or whiskey can add a gourmet twist that beautifully pairs with the chocolate undertones.
Indulging in any of these delightful companions will transform your mini chocolate cake from a simple dessert into a memorable dining experience!
Storage Tips for Mini Chocolate Cake
-
Room Temperature: Store leftovers in an airtight container at room temperature for up to 3 days. This keeps the cake moist and delicious.
-
Fridge: If you prefer a firmer texture, you can keep your mini chocolate cake in the fridge for up to a week. Ensure it’s covered to prevent it from drying out.
-
Freezer: For longer storage, wrap slices in plastic wrap and place them in an airtight container or freezer bag. The mini chocolate cake can be frozen for up to a month.
-
Reheating: To enjoy your cake warm, thaw overnight in the fridge, then gently warm a slice in the microwave for about 10-15 seconds before serving.
Mini Chocolate Cake Variations
Get ready to explore exciting twists on your mini chocolate cake that will delight your taste buds!
-
Gluten-Free Flour: Substitute all-purpose flour with a gluten-free blend for a delightful option everyone can enjoy.
This swap allows those with sensitivities to indulge without compromising taste or texture. -
Almond Extract: Swap vanilla extract with almond extract for a nutty, fragrant twist on flavor.
This tiny change can elevate the overall experience of your cake, adding depth and warmth. -
Cupcake Conversion: Transform your mini cake into cupcakes by baking for just 17-19 minutes instead.
Perfect for parties or sharing, these bite-sized delights make for cheerful presentation options. -
Chocolate Chip Add-In: Fold mini chocolate chips into the batter for bursts of extra chocolate goodness.
Each bite will surprise you with delightful morsels, enhancing the cake’s chocolaty experience! -
Coffee Essence: Include a splash of brewed coffee in the batter to intensify the chocolate flavor.
A subtle boost of espresso cuts through the sweetness, leaving you craving another slice. -
Fruit Fusion: Top with fresh berries or incorporate mashed bananas into the batter for a fruity twist.
Light and refreshing, this variation harmonizes beautifully with the rich chocolate. -
Nutty Crunch: Add chopped walnuts or pecans into the mix for a satisfying crunch.
The contrast in texture elevates your cake, giving it a delightful bite that’s hard to resist. -
Whipped Cream Topping: Instead of frosting, serve your cake topped with whipped cream and shaved chocolate.
Light and fluffy, it complements the dense cake perfectly, making it a captivating dessert to share.
Feeling inspired? You can enhance your dessert experience even further with a side of Coconut Poke Cake or some Moist Chocolate Chip Banana Bread for a sweet finale!
Expert Tips for Mini Chocolate Cake
• Gluten-Free Baking: If using a gluten-free flour blend, whisk the batter vigorously and let it rest for about 30 minutes before baking to improve texture.
• Temperature Matters: Ensure your ingredients, especially the egg white and buttermilk, are at room temperature. This helps them mix better and results in a lighter mini chocolate cake.
• Cooling Time: Allow your cake to cool completely before frosting. This prevents the chocolate buttercream from melting and sliding off, ensuring a beautiful presentation.
• Sifting Cocoa Powder: Always sift cocoa powder before adding it to the batter and frosting to avoid clumps. A smooth batter equals a delightful mini chocolate cake!
• Storage Tips: Leftover frosting can be stored in an airtight container in the fridge for up to a month, making it easy to enjoy your cake later or for other desserts.
• Leveling the Cake: For neat layers, use a serrated knife to trim the tops of your mini chocolate cake rounds for even stacking. This will enhance the overall appearance and stability of your dessert.
Make Ahead Options
These Mini Chocolate Cakes are perfect for meal prep enthusiasts! You can bake the cakes up to 24 hours in advance; simply allow them to cool completely, then wrap them tightly in plastic wrap to keep them moist. The chocolate buttercream frosting can also be prepared ahead—store it in an airtight container in the refrigerator for up to 3 days. To maintain its creamy texture, let the frosting sit at room temperature for about 30 minutes before spreading. When you’re ready to serve, simply layer and frost the cakes as directed, and enjoy the same delicious flavor as if you made them fresh! With these make-ahead steps, busy weeknights just got a lot sweeter!

Mini Chocolate Cake Recipe FAQs
How do I choose ripe ingredients for the Mini Chocolate Cake?
Absolutely! When selecting ingredients, ensure your eggs are fresh and at room temperature for better mixing. Use fresh buttermilk; if it’s slightly tart, that’s fine—a touch of acidity enhances the cake’s flavor. For butter, choose high-quality salted or unsalted, depending on your preference. Lastly, opt for cocoa powder that’s rich, as it impacts the chocolate flavor immensely!
What’s the best way to store Mini Chocolate Cake, and how long does it last?
Very good question! The mini chocolate cake can be stored in an airtight container at room temperature for up to 3 days. If you prefer a firmer texture, refrigerate it for up to a week, just make sure it’s well-covered to prevent it from drying out. For longer storage, freeze slices wrapped in plastic wrap and placed in an airtight container for up to 1 month.
Can I freeze the Mini Chocolate Cake, and what’s the best method?
Of course! Freezing is a great way to save your mini chocolate cake for later enjoyment. Allow it to cool completely, then wrap each slice tightly in plastic wrap. Place the wrapped slices in a freezer-safe bag or container. When ready to indulge, thaw the cake overnight in the fridge, and gently warm a slice in the microwave for a delightful treat!
What should I do if the batter for the Mini Chocolate Cake is too thick?
If your batter appears too thick, don’t worry! This can happen, especially when using gluten-free flour. Gradually add a tablespoon of buttermilk or milk to the batter while gently mixing. Aim for a smooth, pourable consistency without overmixing. Allow the batter to sit for about 10 minutes before baking, which helps enhance texture and rise.
Are there any dietary considerations I should keep in mind for the Mini Chocolate Cake?
Absolutely! If you’re baking for someone with gluten sensitivity, use a certified gluten-free flour blend. You can also make this cake dairy-free by substituting the butter with a plant-based alternative and replacing buttermilk with coconut milk mixed with a splash of vinegar. Always double-check ingredient labels for potential allergens, especially in baking powder and extracts.
How can I adjust the sweetness of the Mini Chocolate Cake?
If you wish to reduce the sweetness, try decreasing the granulated sugar by ¼ cup and adjusting the powdered sugar in your frosting to taste. Remember, it’s often easier to add sweetness than to take it away, so start small! You can also consider adding a pinch of sea salt to the batter, which can balance and enhance flavors without making it taste salty.
Mini Chocolate Cake: A Perfectly Cute Treat to Share
Ingredients
Equipment
Method
- Preheat your oven to 350°F (175°C). Prepare a 6-inch round cake pan by lining the bottom with parchment paper and greasing the sides.
- In a medium mixing bowl, combine the all-purpose flour, granulated sugar, sifted cocoa powder, baking powder, and a pinch of salt. Whisk until fully incorporated.
- Add the melted salted butter and room temperature egg white. Mix until well combined, then pour in the buttermilk and vanilla extract, stirring until smooth.
- Pour the batter into the prepared pan and bake for 25-30 minutes until a toothpick inserted comes out clean.
- Let the cake cool in the pan for 10 minutes before inverting onto a wire rack. Once cool, level the top and slice into four rounds.
- In a large bowl, beat the softened salted butter until creamy. Gradually mix in the sifted cocoa powder and powdered sugar, alternating with heavy cream until smooth.
- Assemble by layering the cake rounds with chocolate buttercream between each. Cover the exterior with more frosting.
Leave a Reply