
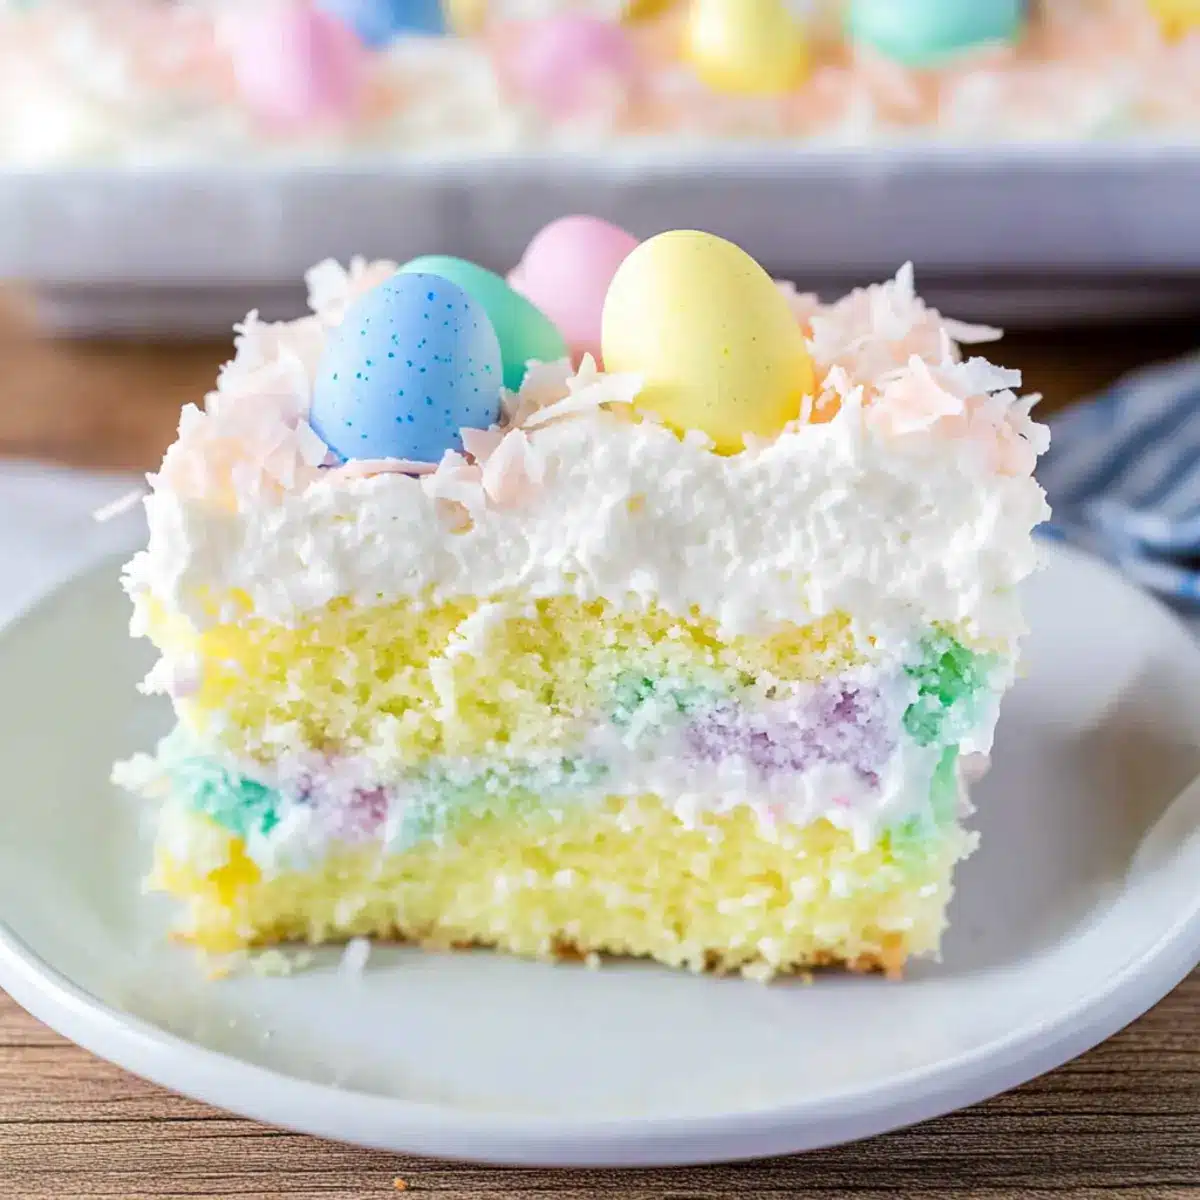
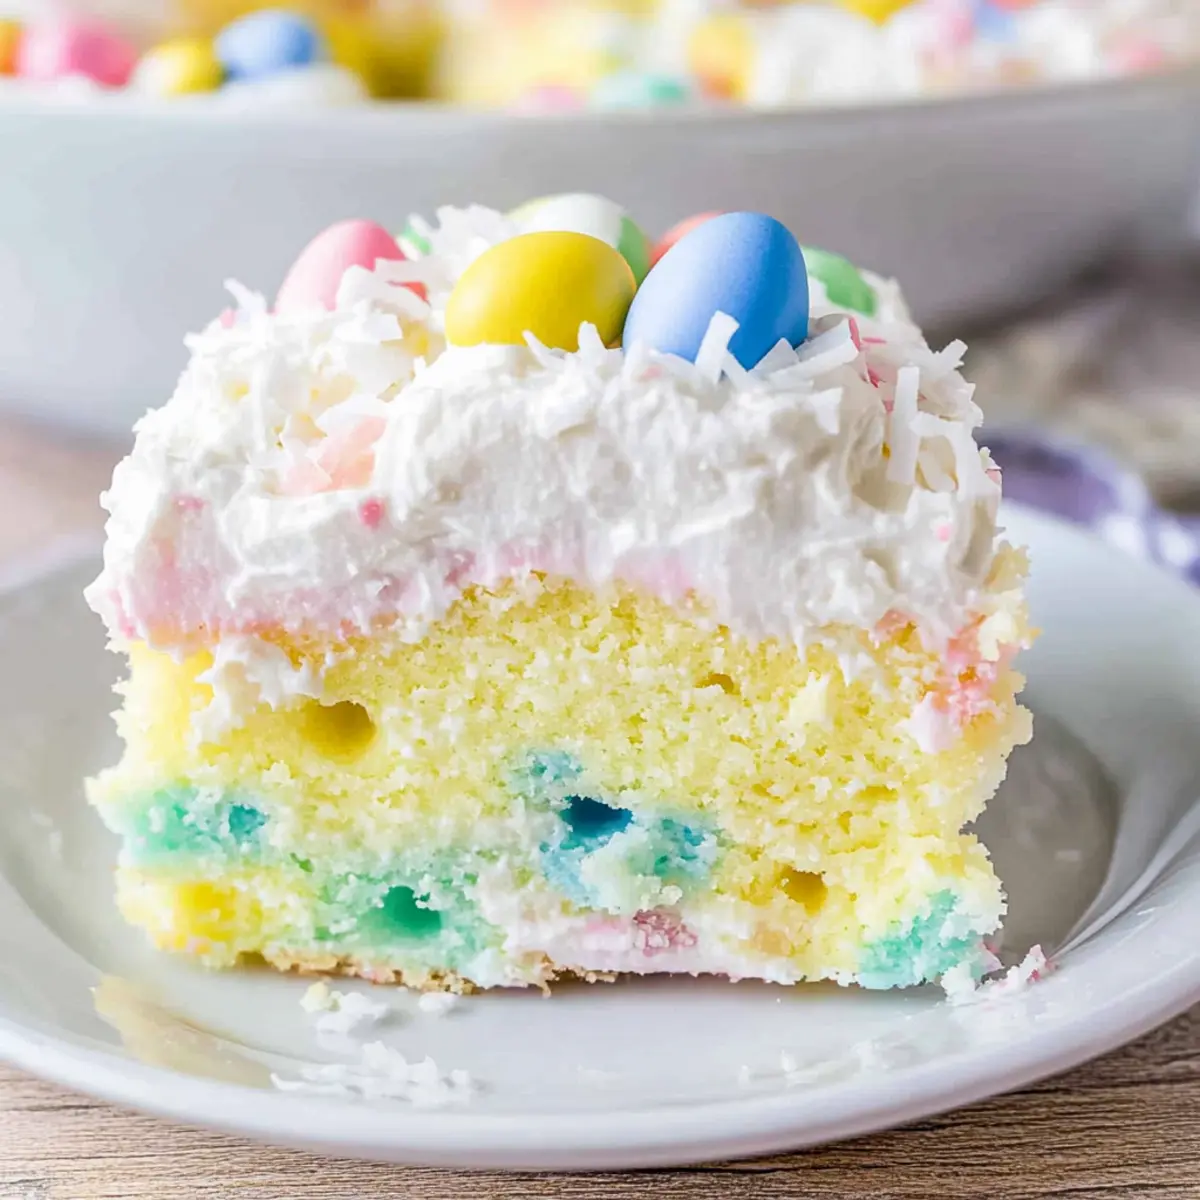
As the vibrant colors of spring start to bloom, there’s nothing quite as cheerful as an Easter Poke Cake. This delightful dessert combines a soft, moist white cake with a creamy vanilla pudding filling, making it an instant crowd-pleaser. What I love most about this easy Easter Poke Cake is how it transforms a simple baking session into a fun, festive activity—a perfect way to celebrate with friends and family. With its fluffy whipped cream topping, sweet coconut, and playful candy eggs, this cake not only looks stunning but also brings joy to every bite. Ready to dive into this colorful treat that’s as easy to whip up as it is to enjoy? Let’s get baking and make your Easter celebrations memorable!
Why is Easter Poke Cake a Must-Try?
Festive and Fun: This Easter Poke Cake is bursting with vibrant colors, making it a stunning centerpiece for your holiday table.
Effortless Preparation: With minimal baking skills required, it transforms the ordinary baking experience into a delightful holiday activity.
Irresistible Creamy Center: The luscious vanilla pudding filling takes every bite to a new level of deliciousness, much like our popular Coconut Poke Cake.
Crowd-Pleasing Appeal: Everyone loves a colorful dessert, and this cake is sure to impress guests of all ages!
Make-Ahead Magic: Perfect for busy schedules, you can prepare it a day in advance, just like our easy Grandmas Fruit Cake.
With its fluffy whipped cream topping and festive decorations, this cake will make your Easter celebration unforgettable!
Easter Poke Cake Ingredients
For the Cake
- White Cake Mix – Provides structure and base flavor for the cake; a homemade vanilla cake batter can be a delightful substitution.
- Egg Whites – Adds leavening for a light cake texture; ensure they’re at room temperature for the best whisking results.
- Vegetable Oil – Keeps the cake moist; melted butter can add a richer flavor if you prefer.
- Greek Yogurt – Contributes to moisture and richness; you can swap it with sour cream in equal amounts for a smooth texture.
- Whole Milk – Hydrates dry ingredients and adds creaminess; any milk alternative works well too.
- Gel Food Coloring (pink, yellow, blue) – Provides vibrant color to the cake layers; gel food coloring intensifies hues without altering batter consistency.
For the Filling
- Instant Vanilla Pudding Mix – Gives a creamy filling that enhances flavor and texture; if you’re looking for something different, chocolate pudding mix can work beautifully too.
For the Topping
- Heavy Cream – Essential for making the whipped cream topping; for a quicker option, consider using Cool Whip.
- Granulated Sugar – Sweetens the whipped cream; for a healthier twist, try using a sugar alternative.
- Sweetened Shredded Coconut – Adds texture and a tropical flavor; you can omit it if it’s not to your taste.
- Easter Sprinkles/Candy Eggs – Decorative topping to enhance festive appeal; any seasonal candies can be an excellent substitute for added fun.
With these essential ingredients, your colorful Easter Poke Cake will be an absolute delight, tempting everyone to indulge in its creamy goodness!
Step‑by‑Step Instructions for Easter Poke Cake
Step 1: Prep the Oven
Start by preheating your oven to 350°F (175°C). While the oven warms up, grease a 9×13-inch baking dish thoroughly to ensure your Easter Poke Cake doesn’t stick after baking. This is an important step to achieve that perfect, easily removable cake!
Step 2: Make Cake Batter
In a large mixing bowl, combine the white cake mix, egg whites, vegetable oil, Greek yogurt, and whole milk. Use an electric mixer at medium speed to beat the mixture for about 2 minutes, or until it reaches a smooth, fluffy consistency. This creates a light base for your festive cake.
Step 3: Color the Batter
Divide the prepared batter equally into three smaller bowls. Add a drop of gel food coloring to each bowl—one pink, one yellow, and one blue. Gently mix each bowl until the colors are vibrant, but avoid overmixing to maintain the cake’s fluffy texture.
Step 4: Layer the Batter
Spoon large dollops of the colored batter into the prepared baking dish, alternating between colors. Once all the batter is in the dish, use a butter knife to swirl the colors slightly; this creates a beautiful marbled effect. Be careful not to overmix, as you want distinct color layers for your Easter Poke Cake.
Step 5: Bake
Place the dish in the preheated oven and bake for 23–28 minutes. The edges should be golden brown, and a toothpick inserted into the center should come out clean. Once baked, remove from the oven and allow the cake to cool completely in the pan on a wire rack.
Step 6: Poke Holes
Once the cake has cooled, take a wooden spoon handle and gently poke holes all over the surface of the cake. Make sure the holes are about an inch apart, as this allows the pudding to seep into the cake effectively, enhancing the flavor of your Easter Poke Cake.
Step 7: Prepare Pudding Layer
In another mixing bowl, whisk together the instant vanilla pudding mix and cold milk for about 2 minutes, until it thickens. Once the mixture is smooth, carefully pour it over the cake, ensuring the pudding fills the holes you’ve made. Spread it evenly across the top.
Step 8: Chill
Cover your cake with plastic wrap and refrigerate for 60–90 minutes. This chilling step allows the pudding to fully set, giving your Easter Poke Cake a delightful creamy center. The chilling process also enhances the overall flavor.
Step 9: Make Whipped Cream
While your cake is chilling, prepare the whipped cream topping. In a large mixing bowl, beat the heavy cream and granulated sugar with an electric mixer until stiff peaks form, which should take about 3–4 minutes. This fluffy topping adds a magnificent finish to your Easter Poke Cake.
Step 10: Decorate
Once the pudding layer is set, spread the whipped cream evenly over the top of your cake. Don’t forget to sprinkle sweetened shredded coconut and arrange festive Easter candy eggs on top for decoration. This adds both texture and a heartwarming festive finishing touch.
Step 11: Final Chill Before Serving
Return the decorated cake to the refrigerator for an additional 2 hours. This final chilling helps everything settle nicely together. When you’re ready to serve your vibrant Easter Poke Cake, slice it up and enjoy the delightful surprise hidden inside with every piece!

What to Serve with Easter Poke Cake
Looking to create a memorable meal that pairs perfectly with this vibrant cake?
-
Fresh Fruit Salad: A medley of seasonal fruits offers a refreshing contrast to the rich cake, balancing sweetness with brightness.
-
Creamy Vanilla Ice Cream: Scoop this classic dessert alongside for a melt-in-your-mouth experience that complements the cake’s creamy filling beautifully.
-
Zesty Lemonade: The tartness of lemonade cuts through the sweetness of the cake, providing a thirst-quenching sip that enhances the whole dessert experience.
-
Chocolate Ganache: Drizzle this warm, glossy topping over slices for an indulgent twist. The rich chocolate flavor adds a decadent contrast to the vanilla pudding.
-
Mini Fruit Tarts: Serve these delightful tarts as a light option that echoes the colorful theme of the cake, offering a crispy base with fresh fruit toppings.
-
Whipped Cream Coffee: A cozy beverage, this coffee elevates the dessert experience with its smooth, creamy texture, making it a great after-dinner companion.
-
Easter-Themed Cookies: A fun addition, these sweet treats can serve as playful accompaniments to the cake’s festive feel, perfect for a holiday celebration.
-
Sparkling Water with Mint: A refreshing drink that cleanses the palate, infused with mint leaves for an elegant touch, making it ideal for springtime gatherings.
These delightful pairings not only elevate your Easter celebrations but also create a balanced meal that’s filled with joyous flavors and textures!
Make Ahead Options
The Easter Poke Cake is an ideal candidate for meal prep, allowing you to enjoy your festive celebration without the last-minute rush. You can prepare the cake up to 24 hours in advance; simply bake it, let it cool completely, and refrigerate it until you’re ready to add the pudding and toppings. For optimal flavor and texture, wait to pour the instant vanilla pudding over the poked cake until just before serving, ensuring it stays fresh and creamy. The whipped cream can also be made ahead; just keep it in an airtight container in the refrigerator for up to 3 days. When it’s time to serve, spread the whipped cream, decorate with coconut and candy eggs, and enjoy a show-stopping Easter dessert that tastes just as delicious as when made fresh!
Easter Poke Cake Variations & Substitutions
Customize your Easter Poke Cake and make it uniquely yours with these fun twists and swaps!
-
Chocolate Twist: Swap the vanilla pudding for chocolate pudding for an indulgent twist. The rich chocolate flavor adds a wonderful depth to this festive cake.
-
Different Colors: Use a mix of different gel food colors to not only match your holiday theme but also to create a joyful visual party that surprises the guests with every slice.
-
Fruit-Infused: Add fresh berries or sliced bananas on top of the pudding layer before spreading whipped cream for a fruity explosion of flavor. A fresh burst of fruit pairs beautifully with the creamy layers.
-
Nutty Crunch: Incorporate crushed nuts, such as pecans or walnuts, into the toppings for a delightful crunch. This variation brings a lovely texture contrast to the smooth pudding and whipped cream.
-
Dairy-Free Delight: You can easily substitute the dairy ingredients with plant-based alternatives, like coconut milk for the whole milk and almond cream for the whipped topping. This ensures everyone can indulge!
-
Spiced Sensation: For a flavor boost, add a pinch of cinnamon or nutmeg to the pudding layer to create a warm, spiced profile that’s perfect for the holiday vibe.
-
Fun Decorations: Get creative with your Easter theme by using colorful edible flowers instead of traditional sprinkles or candy eggs. This twist sparks joy and adds an elegant touch.
-
Frosting Options: Instead of whipped cream, feel free to use a layer of cream cheese frosting for a rich and tangy flavor profile. This change gives a delightful twist, reminiscent of our Crockpot Salted Cake in its creamy indulgence.
Let your creativity shine through these variations, and you’ll make your Easter Poke Cake a true showstopper!
Expert Tips for Easter Poke Cake
-
Use Gel Colors: Ensure to use gel food coloring for a more vibrant Easter Poke Cake, as liquid colors can alter the batter’s texture and consistency.
-
Avoid Overmixing: When swirling the colored batter, be cautious not to overmix, as this maintains the beautiful layers and results in a light, fluffy cake.
-
Poke Holes Effectively: Poke holes about an inch apart to ensure the pudding soaks into the cake properly, resulting in a moist, flavorful filling.
-
Chill Thoroughly: Allow ample time for chilling after adding pudding and whipped cream. This step enhances flavors and ensures the filling sets up beautifully.
-
Experiment with Variations: Try swapping the vanilla pudding for chocolate for a richer taste or add different sprinkles for a unique twist on your Easter Poke Cake.
Storage Tips for Easter Poke Cake
Fridge: Store covered in the refrigerator for up to 3 days to maintain freshness and flavor. This keeps the cake moist and creamy!
Freezer: For longer storage, wrap individual slices tightly in plastic wrap and aluminum foil, freezing for up to 1 month. Thaw in the fridge before serving.
Reheating: If you prefer a warm slice, gently microwave it for about 15-20 seconds. Be cautious not to overheat, as this may alter the texture of the Easter Poke Cake.
Make-Ahead: You can prepare the cake a day in advance, adding the topping on the day of serving for the best presentation and taste.
Easter Poke Cake Recipe FAQs
What type of cake mix is best for Easter Poke Cake?
I recommend using a high-quality white cake mix for the best results. It gives a light and fluffy texture that complements the creamy pudding filling perfectly. If you’re feeling adventurous, you can even make a homemade vanilla cake batter!
How do I store leftover Easter Poke Cake?
Store your Easter Poke Cake covered in the refrigerator for up to 3 days. This helps keep it fresh and moist. Make sure to use an airtight container or wrap it tightly with plastic wrap to prevent it from drying out.
Can I freeze Easter Poke Cake?
Absolutely! To freeze, wrap individual slices tightly in plastic wrap and aluminum foil. This will keep them fresh for up to 1 month. When ready to enjoy, thaw them in the refrigerator overnight before serving.
What should I do if my cake sinks in the middle?
If your Easter Poke Cake sinks, it may be due to underbaking or too much liquid in the batter. Always bake until a toothpick inserted into the center comes out clean—this takes about 23-28 minutes. If you encounter a sinking cake again, consider checking your oven temperature with a thermometer.
Is this cake suitable for those with dietary restrictions?
You can certainly make adjustments to cater to various dietary needs! For a gluten-free option, use a gluten-free cake mix. If someone has dairy allergies, try substituting milk with almond or coconut milk. Always double-check the ingredients for pudding and whipped cream to ensure they align with any allergies.
How can I enhance the flavor of my Easter Poke Cake?
For a tasty twist, consider swapping the vanilla pudding for chocolate pudding for a richer flavor. Adding crushed cookies or fresh fruit on top before serving can also elevate the cake’s taste and texture, making it even more delightful!

Colorful Easter Poke Cake That Will Wow Your Guests
Ingredients
Equipment
Method
- Preheat the oven to 350°F (175°C) and grease a 9x13-inch baking dish.
- In a large mixing bowl, combine the white cake mix, egg whites, vegetable oil, Greek yogurt, and whole milk. Beat the mixture for about 2 minutes until smooth and fluffy.
- Divide the batter into three bowls and add a drop of gel food coloring to each. Mix gently.
- Spoon large dollops of the colored batter into the baking dish, alternating colors and swirling slightly.
- Bake for 23–28 minutes until golden brown. Allow the cake to cool completely.
- Poke holes all over the surface of the cake using a wooden spoon handle, about an inch apart.
- In another bowl, whisk together the instant vanilla pudding mix and cold milk until thickened. Pour over the cake, filling the holes.
- Cover with plastic wrap and refrigerate for 60–90 minutes.
- Beat heavy cream and granulated sugar until stiff peaks form. Spread over the top of the cake after chilling.
- Decorate with sweetened shredded coconut and arrange candy eggs on top.
- Return to the refrigerator for an additional 2 hours before serving.
Leave a Reply